Easy Homemade Nut Butters: Simple Steps, Healthier, Cost-Saving
Are you tired of deciphering cryptic ingredient lists on store-bought spreads? Do you dream of a world where your pantry staples are as pure and natural as nature intended? Then you're in the right place! Making your own nut and seed butters at home is a culinary revolution that's both incredibly simple and profoundly rewarding. It's an opportunity to take control of your diet, save money, and elevate the flavor profile of your everyday meals.
In recent years, the trend of crafting homemade nut butters has surged, and for all the right reasons. These rich, creamy spreads not only taste astonishingly fresh but also offer significant health advantages over their commercial counterparts. Whether your motivation is to find a healthier alternative, customize unique flavor combinations, or simply revel in the satisfaction of creating something delicious from scratch, DIY nut butters are an unparalleled choice. Consider this Your Ultimate Guide to 12 Homemade Nut & Seed Butter Recipes and a gateway to a healthier, more flavorful pantry, offering simple steps to healthier, cost-saving homemade nut butters.
Why Go Homemade? Unpacking the Benefits of DIY Nut Butters
Before we delve into the practicalities of making these delightful spreads, let's explore the compelling reasons why homemade nut and seed butters are a game-changer for your health and wallet. The advantages are clear, making it an easy decision to embrace the DIY approach.
Unparalleled Control Over Ingredients
This is arguably the most significant benefit of making your own nut and seed butters. Store-bought versions often come loaded with unwelcome additions:
- Unnecessary Oils: Many commercial butters use hydrogenated oils or palm oil to improve texture and prevent separation, which can be detrimental to heart health. Homemade butters rely solely on the natural oils of the nuts and seeds themselves.
- Added Sugars: Sweeteners like high-fructose corn syrup or refined sugar are frequently added to enhance flavor, contributing to unwanted calorie intake and potential health issues. Your homemade version can be sugar-free or sweetened naturally and minimally.
- Preservatives and Additives: To extend shelf life, manufacturers often include various chemical preservatives and emulsifiers. With homemade, you get 100% natural, clean ingredients – nothing more, nothing less.
Imagine knowing precisely what goes into every spoonful. This level of transparency means you're feeding your body only the good stuff, free from questionable fillers and artificial enhancers. It's pure, unadulterated goodness.
Significant Cost Savings
While the initial outlay for a good food processor might seem like an investment, the long-term savings are substantial. I've crunched the numbers, and I can confidently say that crafting any homemade seed or nut butter is more cost-efficient than purchasing store-bought. This is especially true if you buy your nuts and seeds in bulk. Wholesale pricing often drastically reduces the per-pound cost, making the raw ingredients surprisingly affordable. Furthermore, when you factor in the cost of specialty flavored butters, the savings multiply. You can create gourmet flavors at a fraction of the price, making your kitchen a hub for economical and delicious creations. Understanding these economic advantages further solidifies the appeal of making your own, as detailed in Natural Seed & Nut Butters: Control Ingredients, Save Money.
Superior Freshness and Flavor
There's an undeniable difference in taste and aroma when you compare a freshly made product to one that's been sitting on a shelf for months. Homemade nut butters boast a vibrant, rich flavor profile that's simply unmatched. Roasting your nuts and seeds just before blending intensifies their natural taste, releasing aromatic oils that create an incredibly fragrant and delicious spread. This freshness also means better nutrient retention, ensuring you get the most out of every wholesome ingredient.
Versatility and Thoughtful Gifting Potential
Beyond being a healthier and more economical choice for your own consumption, homemade nut and seed butters are incredibly versatile. They can be a fantastic addition to smoothies, oatmeal, toast, sandwiches, baking recipes, and even savory sauces. Moreover, beautifully packaged jars of homemade nut butter make for a truly unique and delicious edible gift, perfect for holidays like Christmas or as a thoughtful gesture any time of year. Imagine assembling a personalized edible gift basket featuring a selection of your own artisanal butters!
Your Step-by-Step Journey to Perfect Homemade Nut Butter
Now, let's get right into the "how-to" – what everyone truly wants to know. Is it hard to make homemade nut and seed butters? The fantastic news is that I can't overstate how simple these recipes are. The basic process is almost identical for every nut and seed, consisting of just four core steps. Honestly, since I started making my own, I can't imagine returning to store-bought versions!
Step 1: Roast for Richness (10-15 Minutes)
While some butters can be made raw, roasting is often the key to unlocking deeper, more complex flavors and helping the natural oils release more easily.
- Preheat your oven: Typically to around 350-375°F (175-190°C).
- Spread evenly: Arrange your nuts or seeds in a single layer on a baking sheet.
- Roast until fragrant: Bake for approximately 10-15 minutes, stirring once or twice to ensure even toasting. Keep a close eye on them, as nuts can go from perfectly toasted to burnt very quickly! You're looking for a warm, fragrant aroma and a slightly golden hue.
Step 2: A Brief Cool Down
Once roasted, remove the nuts or seeds from the oven and allow them to cool down slightly. This isn't about getting them completely cold; rather, it's about bringing them to a temperature that won't overheat your food processor or blender, and allows the natural oils to settle slightly before the blending process. A few minutes on the baking sheet or spread out on a clean towel is usually sufficient.
Step 3: The Power of Your Processor
This is where the magic truly happens! A reliable food processor or a high-powered blender is your most important tool. Over the years, I've tried various models with differing performance, and while most will eventually get the job done, a powerful machine will significantly reduce your blending time and yield a smoother product. Ensure your processor bowl is clean and dry.
Step 4: Blend, Blend, Blend! The Mesmerizing Transformation
Now for the most satisfying part. Add your slightly cooled nuts or seeds to your food processor. Then, start blending!
- Initial Grind: The nuts/seeds will first break down into a coarse meal, similar to breadcrumbs.
- Sticky Phase: Continue blending, and the meal will begin to clump together, forming a thick, sticky paste. At this stage, you'll need to stop the machine periodically and scrape down the sides of the bowl to ensure everything is evenly processed.
- The Release: As you keep blending, the natural oils within the nuts/seeds will begin to release. The paste will transform, becoming progressively smoother, shinier, and more fluid. This is the moment you've been waiting for!
- Achieving Creaminess: The longer you blend, the smoother and more liquid your end product will become. Depending on the type of nut/seed and the power of your appliance, this process can take anywhere from 5 to 30 minutes. Be patient and trust the process!
You'll witness a remarkable transformation, from solid nuts to a creamy, dreamy butter, all powered by friction and their inherent natural oils.
Pro Tips for Achieving Silky Smooth Butters Every Time
Even with such a straightforward process, a few insider tips can elevate your homemade nut butter game from good to absolutely perfect every single time.
- Don't Overload Your Machine: While it might be tempting to make a giant batch, avoid filling your food processor beyond its recommended capacity. Overloading can strain the motor, lead to uneven blending, and prolong the processing time significantly. Work in manageable batches if necessary.
- Patience is a Virtue: As mentioned, the blending process takes time. Don't be discouraged if it doesn't become smooth instantly. There will be stages where it looks crumbly or stuck; just keep blending and scraping.
- Scrape Down Regularly: This cannot be emphasized enough! Stop your processor every few minutes and use a spatula to scrape down the sides of the bowl. This ensures that all the material gets incorporated and blended evenly, preventing dry spots and promoting uniform smoothness.
- Listen to Your Processor: If your machine feels like it's overheating or struggling, give it a short break (1-2 minutes) to cool down before resuming. This prolongs the life of your appliance.
- Taste and Adjust: Once your butter reaches your desired consistency, taste it! This is the perfect time to add a pinch of salt to enhance the flavor, or a touch of natural sweetener like maple syrup, honey, or a pitted date for a subtly sweet finish. For flavored butters, consider cinnamon, vanilla extract, or even cocoa powder for a rich chocolate spread. Add these after the butter has reached its smooth consistency and blend for just another minute to incorporate.
- Storage Savvy: Transfer your freshly made nut or seed butter into clean, airtight jars or containers. Store at room temperature for up to 2-3 weeks, or refrigerate for up to 1-2 months for extended freshness. Be aware that refrigeration can cause the butter to firm up, but it will soften again at room temperature. Natural oil separation is completely normal; just give it a good stir before each use.
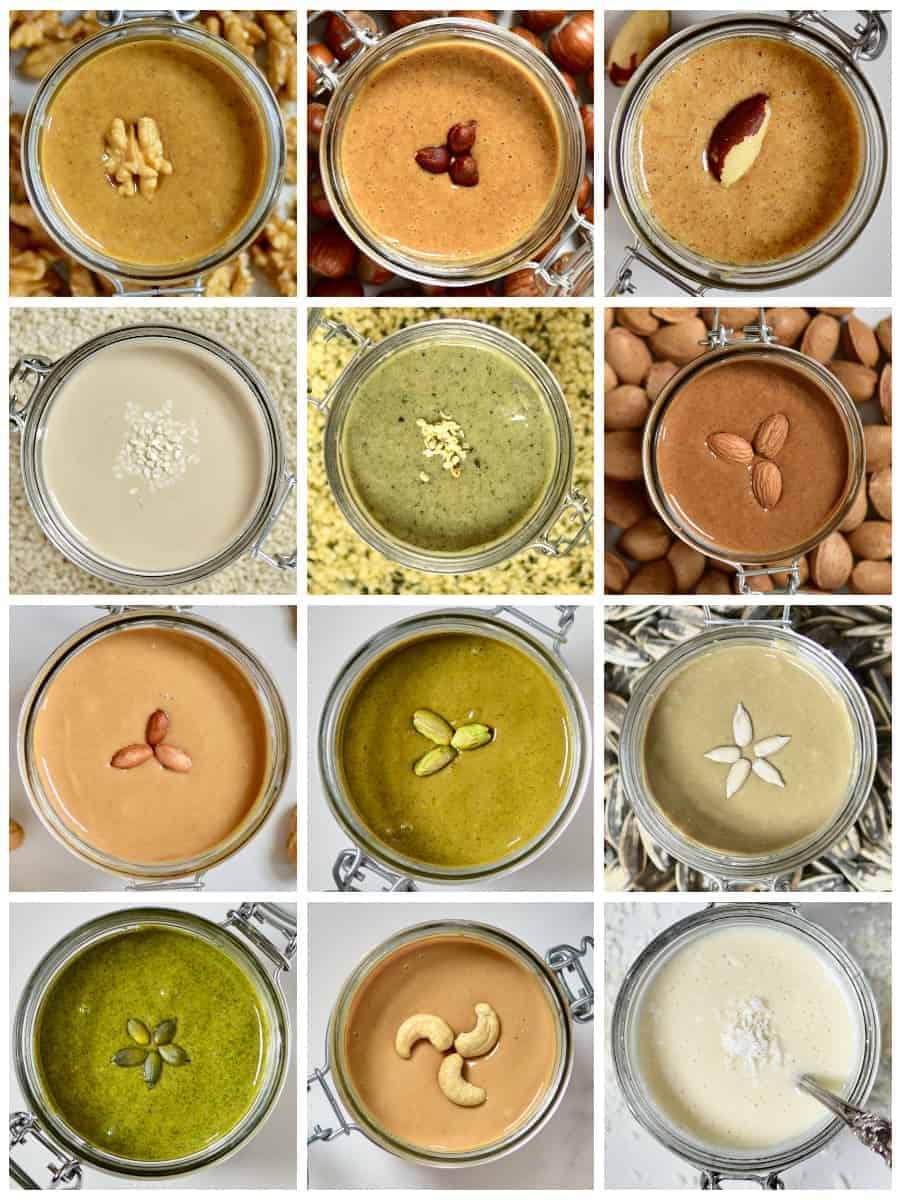
A World of Butters: Exploring Popular and Unique Recipes
The beauty of homemade nut and seed butters lies in the endless possibilities. The core method remains consistent, but the distinct flavors and nutritional profiles of different nuts and seeds open up a universe of delicious spreads. Here are some of the fantastic varieties you can create, covering both classic favorites and some adventurous choices:
Classic Nut Butters:
- Almond Butter: A beloved staple, rich in Vitamin E and magnesium. Versatile for sweet or savory applications.
- Peanut Butter: The ultimate comfort food! Economical and protein-packed.
- Cashew Butter: Exceptionally creamy with a mild, slightly sweet flavor, perfect for those who prefer a less intense taste.
- Hazelnut Butter: Distinctively aromatic, a natural pairing with chocolate (think homemade "Nutella"!).
- Walnut Butter: Known for its Omega-3 fatty acids, offering a slightly bitter, earthy flavor that pairs well with fruits and cheeses.
- Brazil Nut Butter: Rich in selenium, this butter has a unique, almost buttery flavor.
Nutrient-Dense Seed Butters:
- Pumpkin Seed Butter: A vibrant green spread, rich in zinc and magnesium. Great for those with nut allergies.
- Sunflower Seed Butter: Another excellent nut-free alternative, packed with Vitamin E. Its robust flavor is fantastic on toast or in baking.
- Hemp Seed Butter: A nutritional powerhouse, boasting Omega-3 and Omega-6 fatty acids, and complete protein. Its mild, earthy flavor is wonderfully versatile.
- Sesame Butter (Tahini): Essential for Mediterranean and Middle Eastern cuisine, tahini is a savory, nutty spread that forms the base of hummus and many dressings.
- Coconut Butter: Made from dried coconut meat (not oil), this offers a rich, tropical flavor and a unique, almost melt-in-your-mouth texture when warm.
For detailed instructions on each of these delectable spreads, be sure to check out Your Ultimate Guide to 12 Homemade Nut & Seed Butter Recipes, where you'll find specific ratios and expert tips for perfecting each batch.
Conclusion
Embarking on the journey of making your own homemade nut and seed butters is a decision you won't regret. It's a simple, empowering step towards a healthier lifestyle, offering complete control over ingredients, significant cost savings, and unparalleled freshness and flavor. From the rich creaminess of cashew butter to the vibrant earthiness of pumpkin seed butter, the possibilities are endless and deliciously rewarding. So, dust off your food processor, gather your favorite nuts and seeds, and prepare to transform your pantry with these simple, healthier, and cost-saving creations. Your taste buds, your wallet, and your body will thank you.
