The culinary landscape has seen a significant shift towards healthier, more natural eating, and at the heart of this movement is the rising popularity of homemade nut and seed butters. Forget the days of settling for store-bought versions laden with unwanted additives; now, you can create delicious, wholesome spreads right in your own kitchen. If you're ready to embrace a world of unparalleled flavor, control over ingredients, and impressive cost savings, then you've found the ultimate guide homemade seed nut butter recipes.
This comprehensive article isn't just a list; it's your complete roadmap to mastering the art of homemade nut and seed butters. We've spent countless hours perfecting techniques and exploring ingredients to bring you an invaluable resource. Here, you'll discover the compelling benefits of going DIY, a simple step-by-step process that works for almost every nut and seed, invaluable tips for achieving perfection every time, and a treasure trove of 12 distinct recipes to get you started on your delicious journey.
Why Go Homemade? The Irresistible Benefits of DIY Nut & Seed Butters
Before we dive into the 'how,' let's explore the compelling 'why.' The surge in homemade nut butter enthusiasm is no accident; it stems from a desire for better health, better taste, and better value.
Uncompromised Ingredient Control
Perhaps the most significant advantage of crafting your own nut and seed butters is the absolute control you gain over the ingredients. Store-bought options often hide a slew of unwelcome surprises: hydrogenated oils, excessive refined sugars, artificial preservatives, and emulsifiers. When you make your own, you're guaranteed 100% natural, clean ingredient recipes. It’s just the pure goodness of nuts or seeds, perhaps a pinch of salt, and any natural flavorings you choose. This transparency is a game-changer for anyone managing allergies, dietary restrictions, or simply striving for a cleaner diet.
Significant Cost Savings
At first glance, buying a bag of nuts might seem more expensive than a jar of butter. However, when you do the math, homemade wins hands down. Especially if you buy your nuts and seeds in bulk, the cost efficiency becomes abundantly clear. Furthermore, when you start experimenting with unique flavor combinations – a sprinkle of cinnamon, a touch of vanilla, or a hint of cocoa – you'll find that crafting gourmet versions at home is vastly more economical than purchasing specialty store brands. Discover more ways to save and eat healthier by checking out our guide on Easy Homemade Nut Butters: Simple Steps, Healthier, Cost-Saving.
Personalized Flavors and Nutritional Boosts
Beyond purity and savings, homemade butters offer a canvas for culinary creativity. Want a spicy peanut butter? Add a pinch of chili. Craving a maple-pecan spread? Infuse it during blending. You can tailor the sweetness, saltiness, and spice profile to your exact preferences. Moreover, nuts and seeds are powerhouses of nutrition, packed with healthy fats, protein, fiber, vitamins, and minerals. By making your own, you ensure these nutritional benefits remain undiluted by unnecessary additives.
Thoughtful Edible Gifts
Homemade nut and seed butters transcend daily sustenance; they make for incredibly thoughtful and delicious edible gifts. Imagine a beautifully packaged jar of freshly made pistachio butter or a spiced almond butter nestled within an edible Christmas gift basket. They're unique, personal, and a testament to your care, making them perfect for holidays, hostess gifts, or a simple gesture of appreciation.
The Simplicity of Crafting Your Own Nut & Seed Butters
The idea of making your own nut butter might sound intimidating, but let us reassure you: it's surprisingly simple! The process is almost identical for nearly every nut and seed, making it an incredibly accessible culinary skill. Once you try it, you'll wonder why you ever bought it from a store.
Essential Equipment: Your Food Processor is Key
The undisputed hero of homemade nut and seed butters is a reliable food processor or a high-powered blender. While we've experimented with various models over the years, most decent machines will get the job done. The more powerful your equipment, the faster and smoother your butter will be, but even a standard food processor, given a little patience, will deliver excellent results. Ensure your appliance has strong blades capable of handling dense ingredients.
The Four-Step Journey to Perfect Butter
Let's break down the straightforward process into four core steps:
- Roasting for Enhanced Flavor: This is a crucial step for most nuts and seeds (some, like hemp seeds, can be used raw, but roasting deepens flavor). Spread your nuts or seeds evenly on a baking sheet and roast them in a preheated oven for about 10-15 minutes at around 325-350°F (160-175°C). Roasting not only intensifies their natural taste but also helps to release their oils, making the blending process much smoother. Keep a close eye on them to prevent burning, which can lead to bitterness. You'll know they're ready when they're fragrant and slightly golden.
- Cooling Down Slightly: Once roasted, allow your nuts or seeds to cool down for about 5-10 minutes. While you don't want them completely cold (warmth aids oil release), letting them cool slightly prevents overheating your food processor and helps achieve optimal texture.
- Processing Power: Transfer the warm nuts or seeds to your food processor or high-powered blender. Begin processing. Initially, they will break down into coarse crumbs. This is normal!
- The Blending Marathon: This is where the magic happens and patience is key. Continue to blend, blend, blend! The mixture will go through several stages: from coarse crumbs to a finer meal, then to a clumpy paste, and eventually, as the natural oils are released, it will transform into a smooth, creamy butter. Depending on the nut/seed and your machine's power, this can take anywhere from 5 to 30 minutes. Be sure to stop and scrape down the sides of the bowl frequently to ensure even processing. The longer you blend, the smoother and runnier your end product will be. For more insights on the pure advantages of making your own, explore our article on Natural Seed & Nut Butters: Control Ingredients, Save Money.
Expert Tips for Flawless Homemade Nut & Seed Butters Every Time
While the process is simple, a few insider tips can elevate your homemade butters from good to truly spectacular:
- Patience is Paramount: The most common mistake beginners make is giving up too soon. The transformation from solid to creamy takes time. Don't be alarmed if it seems like a dry paste forever; keep blending, and the oils will release.
- Scrape, Scrape, Scrape: Regularly stop your machine and use a spatula to scrape down any ingredients clinging to the sides. This ensures everything is evenly processed and prevents your motor from working too hard on dry pockets.
- Don't Overload or Underload: Ensure you have enough nuts/seeds in the processor for the blades to catch and work efficiently, but don't overfill it, which can strain your motor and prevent proper circulation.
- Consider Add-ins Wisely: If adding salt, sweeteners (like maple syrup or honey), or spices (cinnamon, vanilla extract), generally add them towards the end of the blending process, once the butter has reached a relatively smooth consistency. If your butter is too thick for your liking, you can add a tiny amount of a neutral oil (like grapeseed or coconut oil) or even a bit of water (for tahini), but add sparingly, as a little goes a long way.
- Storage Savvy: Store your homemade nut and seed butters in an airtight container in the refrigerator. This extends their freshness significantly, typically for 2-4 weeks, depending on the ingredients. While some might last longer at room temperature, refrigeration is best to prevent oils from going rancid.
- Embrace the Natural Separation: Like natural store-bought butters, homemade versions will separate over time, with oils rising to the top. This is perfectly normal! Just give it a good stir before each use.
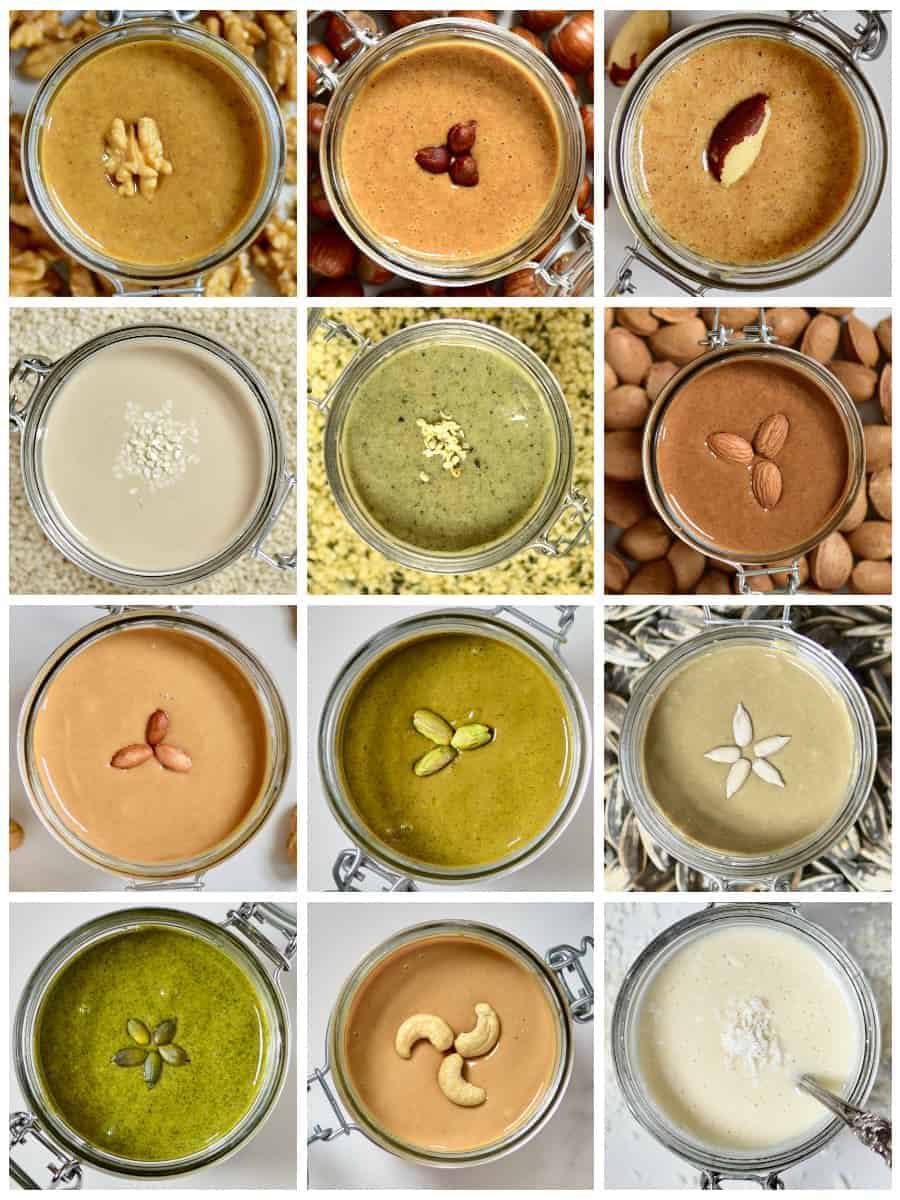
Unveiling 12 Delicious Homemade Nut & Seed Butter Recipes
Now, for the moment you've been waiting for! Here are 12 incredible nut and seed butter recipes you can master using the simple techniques outlined above. Each offers a unique flavor profile and textural experience, ready to elevate your toasts, smoothies, sauces, and snacks.
- Almond Butter: A versatile classic, perfect for almost any application. Roast until deeply golden for the best flavor.
- Pistachio Butter: A vibrant green and subtly sweet butter, fantastic for desserts or a unique spread.
- Cashew Butter: Incredibly creamy and naturally sweet, often requiring less blending time due to its softer texture.
- Brazil Nut Butter: Rich and buttery, packed with selenium, offering a distinctive flavor.
- Walnut Butter: Earthy and slightly bitter, excellent for savory dishes or with apples.
- Hazelnut Butter: Naturally sweet and fragrant, the basis for many beloved chocolate spreads.
- Pumpkin Seed Butter: Nutty, green, and rich in nutrients, a fantastic alternative for those with nut allergies.
- Hemp Seed Butter: A smooth, slightly earthy butter that doesn't require roasting and is a complete protein powerhouse.
- Sunflower Seed Butter: Mildly nutty and allergy-friendly, a great all-purpose spread.
- Peanut Butter: The beloved classic, infinitely better when homemade with freshly roasted peanuts.
- Sesame Butter (Tahini): Made from roasted sesame seeds, essential for hummus and many Mediterranean dishes.
- Coconut Butter: Made from dried shredded coconut, transforming into a rich, decadent, and tropical spread.
Conclusion
Embarking on the journey of making your own nut and seed butters is a deeply rewarding experience. You gain unparalleled control over ingredients, unlock significant cost savings, and open up a world of customizable flavors that simply can't be replicated by store-bought options. With the ultimate guide homemade seed nut butter recipes in hand, along with a reliable food processor and a touch of patience, you're well-equipped to create delicious, healthy, and natural spreads that will become staples in your kitchen. So, gather your favorite nuts and seeds, fire up your food processor, and prepare to be amazed by the incredible taste and satisfaction of truly homemade goodness!
